Customize your Webflow template with confidence using this step-by-step guide. Learn how to update branding, content, fonts, and layouts, while keeping your site responsive, professional, and easy to maintain.
Bought a Webflow template but not sure how to make it your own without breaking the layout or ruining the clean design? You’re not alone. Customizing a Webflow template can feel intimidating especially if you don’t have a background in design or development.
In this guide, I’ll walk you through how to customize a Webflow template step-by-step, answer common questions, and share best practices to help you keep your website looking polished and professional.
Before we dive in, it’s important to understand that not all Webflow templates are built the same. Some are structured more professionally with reusable styles that make them super easy to customize. If you’re still deciding which template to start with, here’s my step-by-step guide to choose the best Webflow template for your business.
How do I find the Webflow template I bought so I can start editing it?
After buying a Webflow template, many people expect it to show up automatically as a project in their dashboard but that’s not how it works. When you purchase a template, Webflow saves it under your account, but you’ll need to manually create a site from it before you can start editing.
Here’s how to find and use your purchased Webflow template:
Go to your Webflow Dashboard.
Click “New Site” in the top right corner
Under “Select a way to get started”, select “Templates
Check the “Purchased” box to see the template(s) you have bought.
Select the template which you would like to use. It will open for you inside the Webflow Designer where you can start editing it.
Note: Webflow frequently makes minor tweaks to its UX so this flow may change slightly. I’ll do my best to update this post as soon as that happens.
How to find and use the Webflow template you bought - Select "Template"
Find the Webflow template you bought by checking the "Purchased" checkbox under Templates
Before you start editing, gather everything you’ll need
Before jumping straight into changing text or replacing images, take a moment to prepare. A little planning now can save hours of frustration later and help you avoid random edits that break the flow of a professionally designed layout.
Here’s what to gather before you start customizing:
Your logo - Ideally, a high-resolution version in SVG or PNG format. Make sure it looks crisp on both light and dark backgrounds, especially if the template uses one or both themes. Upload this to the “Assets” panel in the Webflow Designer.
Your brand colors - Even if you just plan on using two or three colors, have the HEX/color codes ready. You’ll use these when updating global styles, buttons, links, and backgrounds.
Fonts (if you plan on changing them) - If your brand uses specific fonts that aren’t already in the template, this is a good time to upload your brand fonts to your Webflow website. You can do this by going to Site Settings > Fonts > Custom fonts. Use a light-weight, web-friendly format like WOFF2 or TTF. If your font files are heavy and you're worried they'll slow down your website, you can check out my guide on optimizing fonts so they don’t slow down your website.
Your website copy (text content) - Prepare your homepage copy, service descriptions, about section, and contact info in a Google or Word document. It’s much easier to copy-paste polished text than try to write directly inside Webflow.
Images and graphics - Gather all the images you want to use (team photos, service images, product screenshots, stock photos, etc). It’s best if you resize them right now to make sure they don’t slow down your website later. Here’s my guide on optimizing images to ensure a fast-loading website. Once you have your images, upload them to the “Assets” panel in the Webflow Designer.
Your social links and contact details - You’ll need these for the header, footer, contact form, and social icons.
You don’t stricly need everything to be finalized before you start, but the more you can gather now, the smoother your customization process will be.
6 steps to edit your Webflow template the smart way
Once your assets are ready, it’s time to start customizing but instead of randomly clicking around, let’s go about it the smart way. A well-structured Webflow template will have global styles, reusable components, and variables that make customization easier and faster, if you know where to look.
Step 1: Add your logo to your Webflow template
Go to the Navbar (usually marked in green as a component)
Double-click to open the component.
Click on the logo image → go to the Settings panel → click Replace Image → choose your logo from the Asset panel.
Since it’s a component, the logo will now update across all pages where that navbar is used.
[Pro tip: Some templates also include the logo in the footer. Repeat the process there to keep things consistent.]
How to upload your logo and other images to your Webflow template
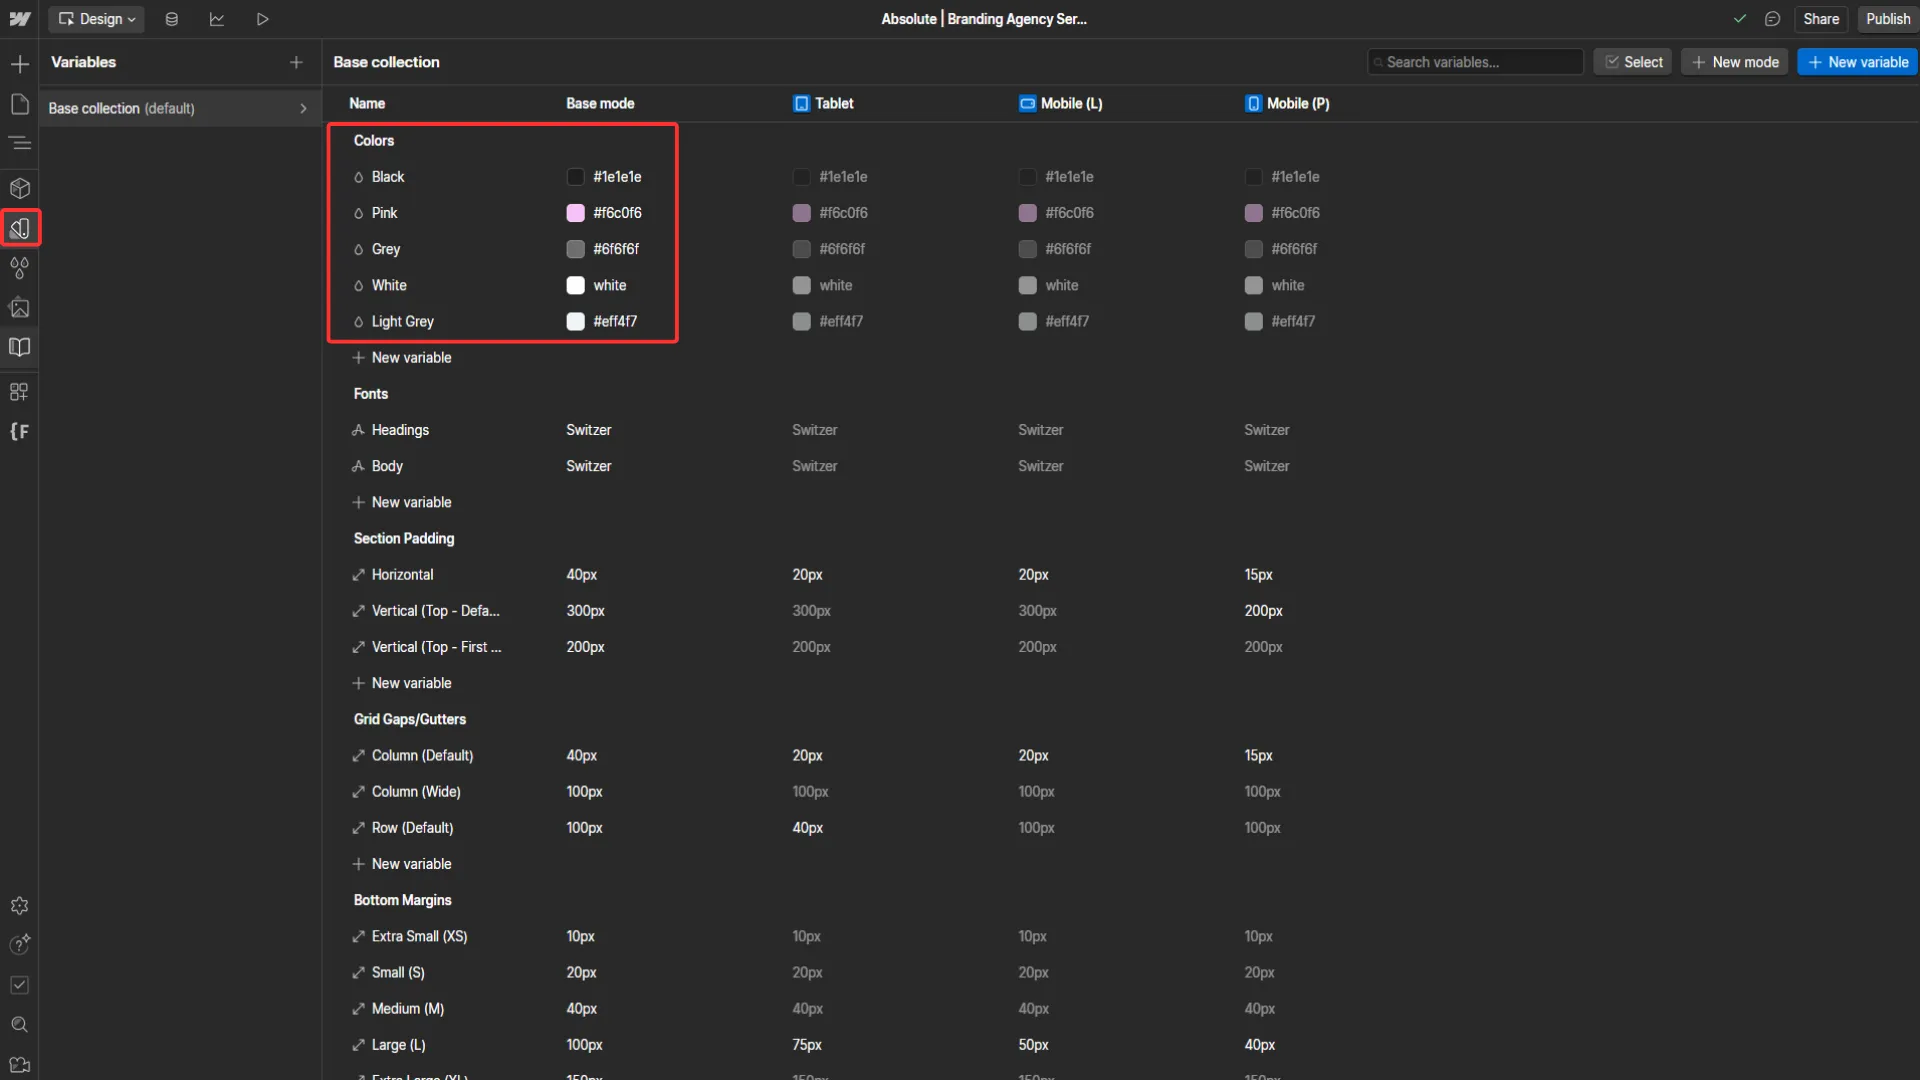
Step 2: Add your brand colors to the Webflow template
To update colors across your template, go to the Variables panel:
Open the Variables tab (paint drop icon on the left).
You’ll see all the color swatches used throughout the template.
Replace them with your own HEX codes.
Note: You won’t see changes update live across the entire site in real time from this panel. You will have to exit out of the Variables panel to see the changes in the Designer.
How to add your brand colors to your Webflow template
Step 3: Change fonts across the whole Webflow template
Go to the Style Guide page in the template (all Webflow templates are required to include this page). This is where you’ll find the foundational styles for all typography. This page is your best friend when making global changes.
Start with the Body (All Pages) base tag. Select it → go to the Typography settings in the Style panel → change the font. This will change the font across the whole website.
In certain cases, headings may use a different font from the Body. In that case, go to any heading, example, H1. Select the pink base tag for that heading go to the Typography settings in the Style panel → change the font. You will be able to see all the changes in front of you on the Style Guide page in real time
How to replace Webflow template font with your own font
Step 4: Replace the template content with your own copy
You can do this simply by double-clicking any text block on any page and start editing just like in a normal text editor. Keep your tone consistent with your brand voice and try to match the character length of the original text to maintain the layout. Update all text across the template using the Google or Word document you prepared, including:
Headlines
Paragraph text
Button text
Labels and callouts
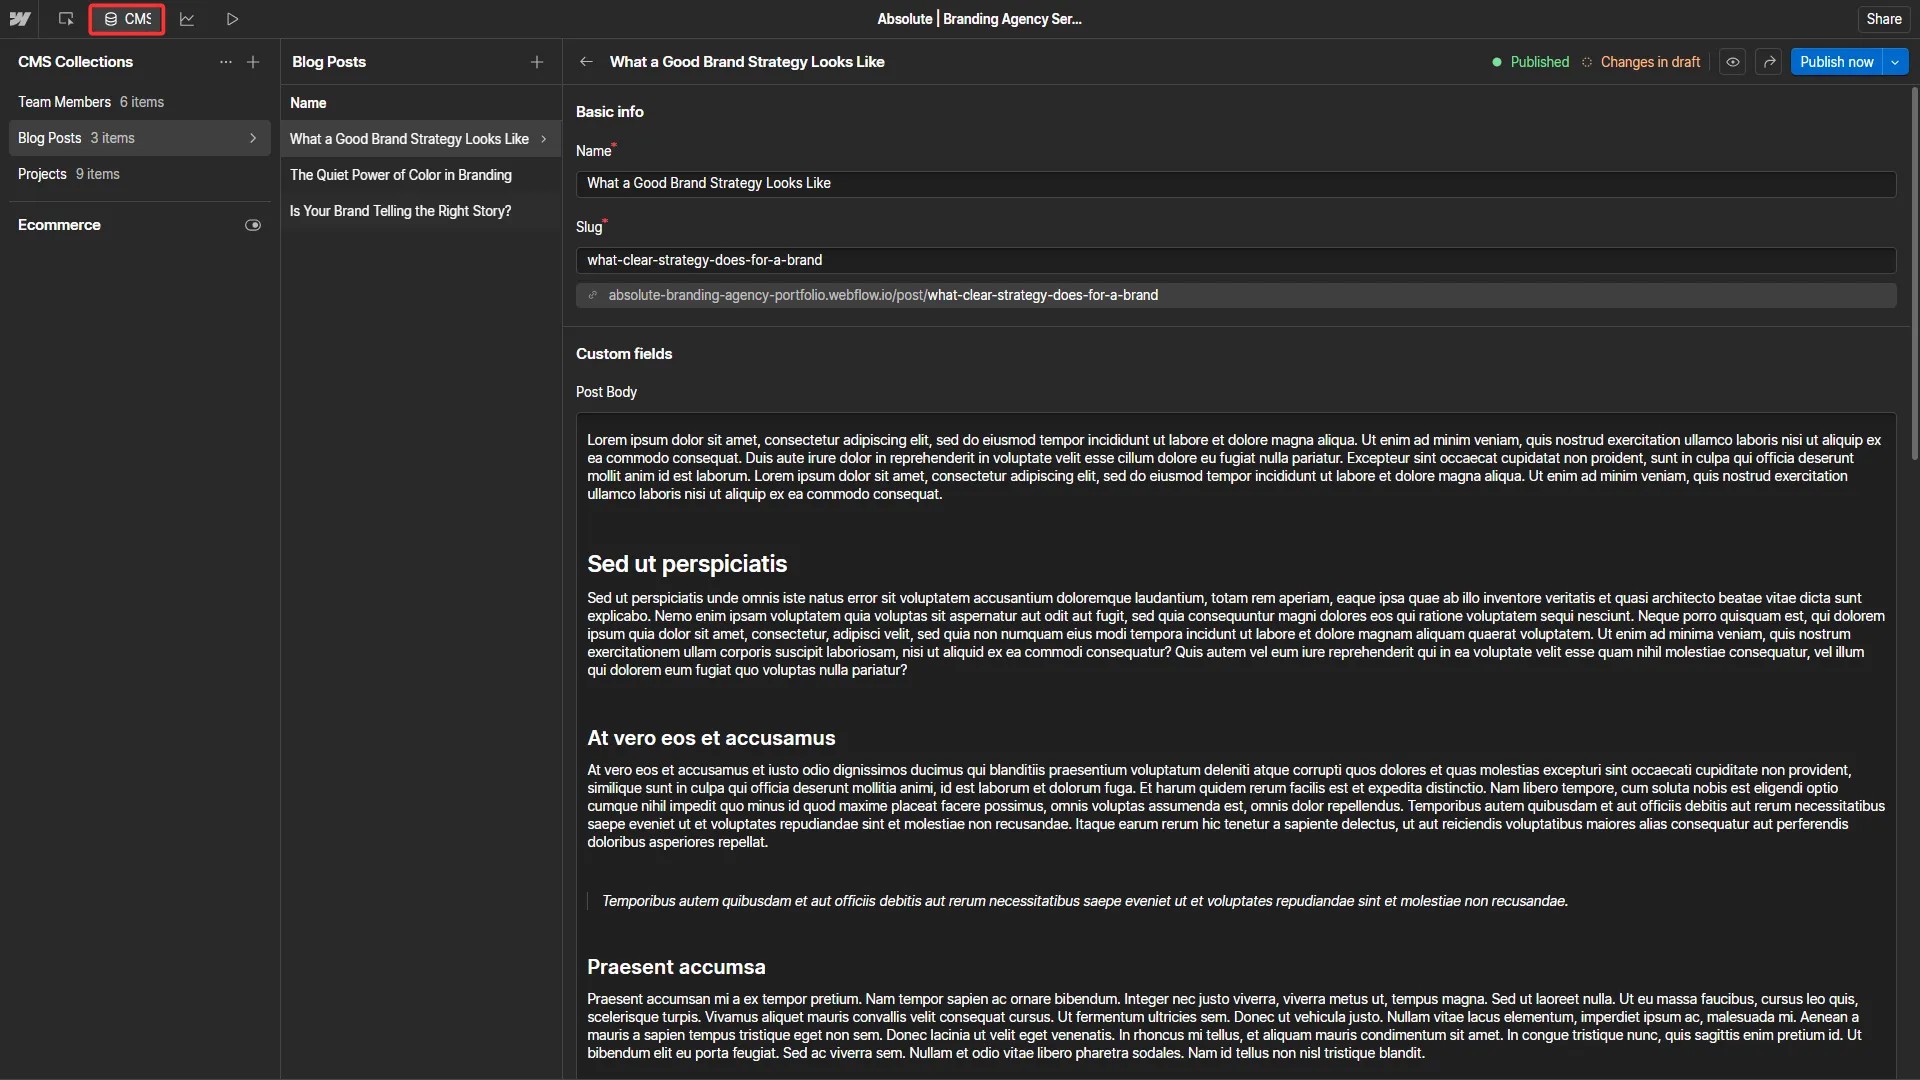
How do I add my CMS or e-commerce content like blog or products in the Webflow template?
If your template includes a CMS-powered blog or case studies section, you'll find a CMS Collection already set up in the left sidebar (Database icon).
To add your content:
Open the CMS tab (left panel).
Click on the relevant Collection (e.g., Blog Posts, Projects, Case Studies).
Click any item to start editing it or click “New item” to add a new post.
Fill in the fields like title, thumbnail, summary, etc.
Click Create and then Publish to push it live.
The design is already built so your content will automatically appear in the template’s layout (e.g., blog list or case study grid) with the styling intact.
How to add and edit CMS items like blog posts in your Webflow template
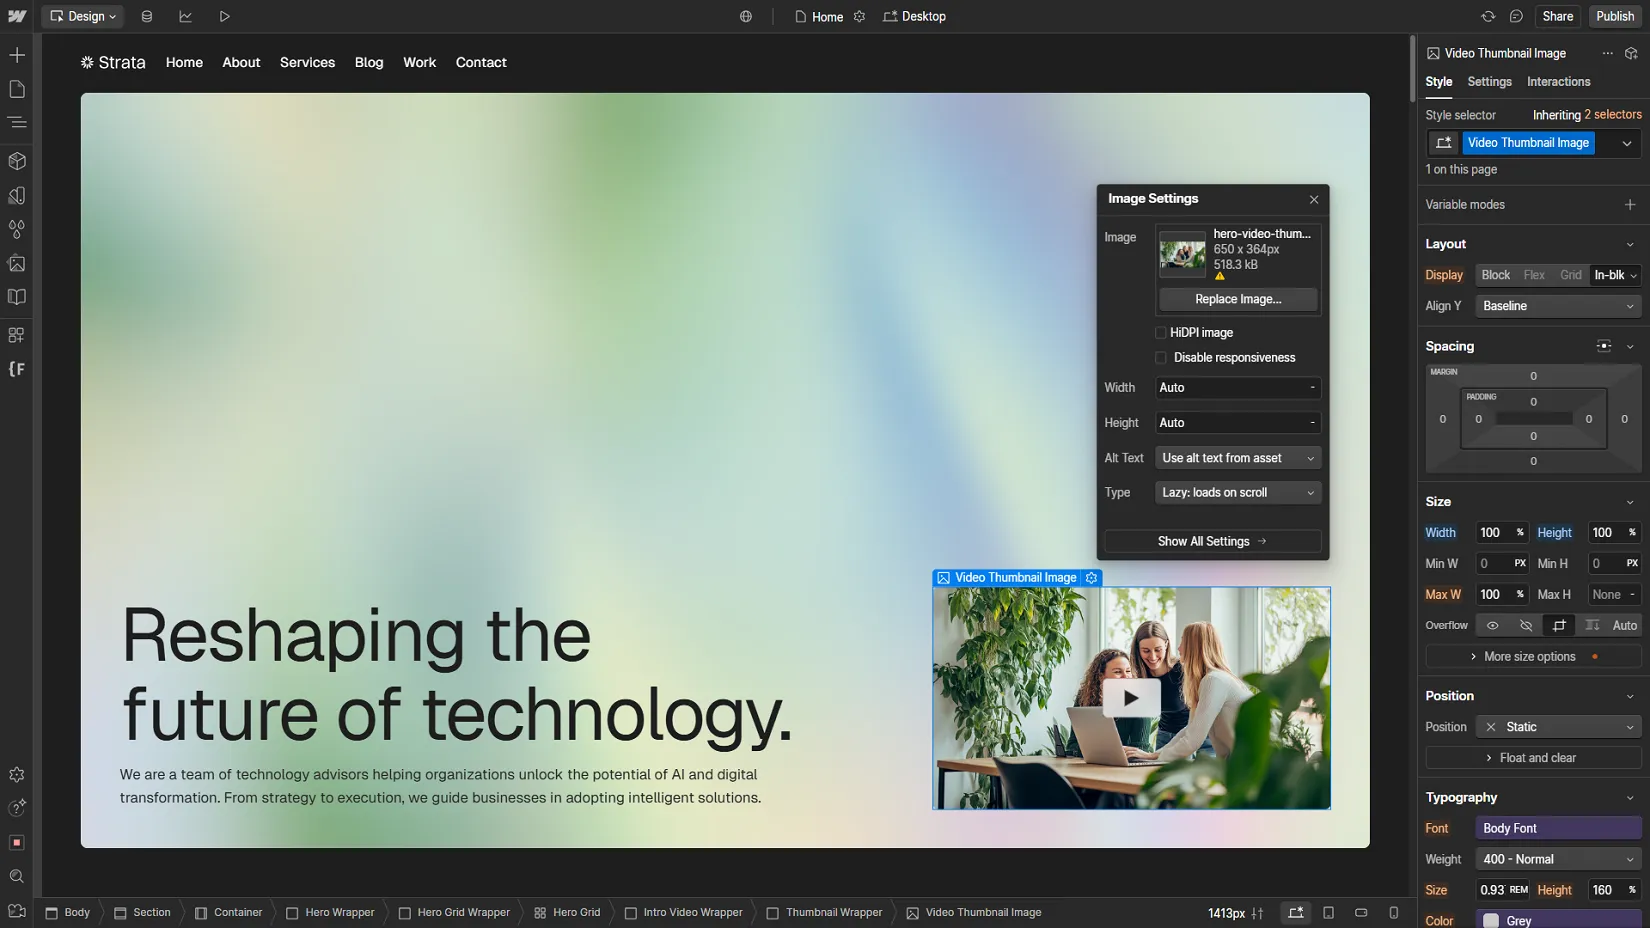
Step 5: Replace template images with your own photos
Click on any image to select it. Then:
Go to the Settings panel
Click Replace Image
Choose a file from the Asset panel or upload a new one
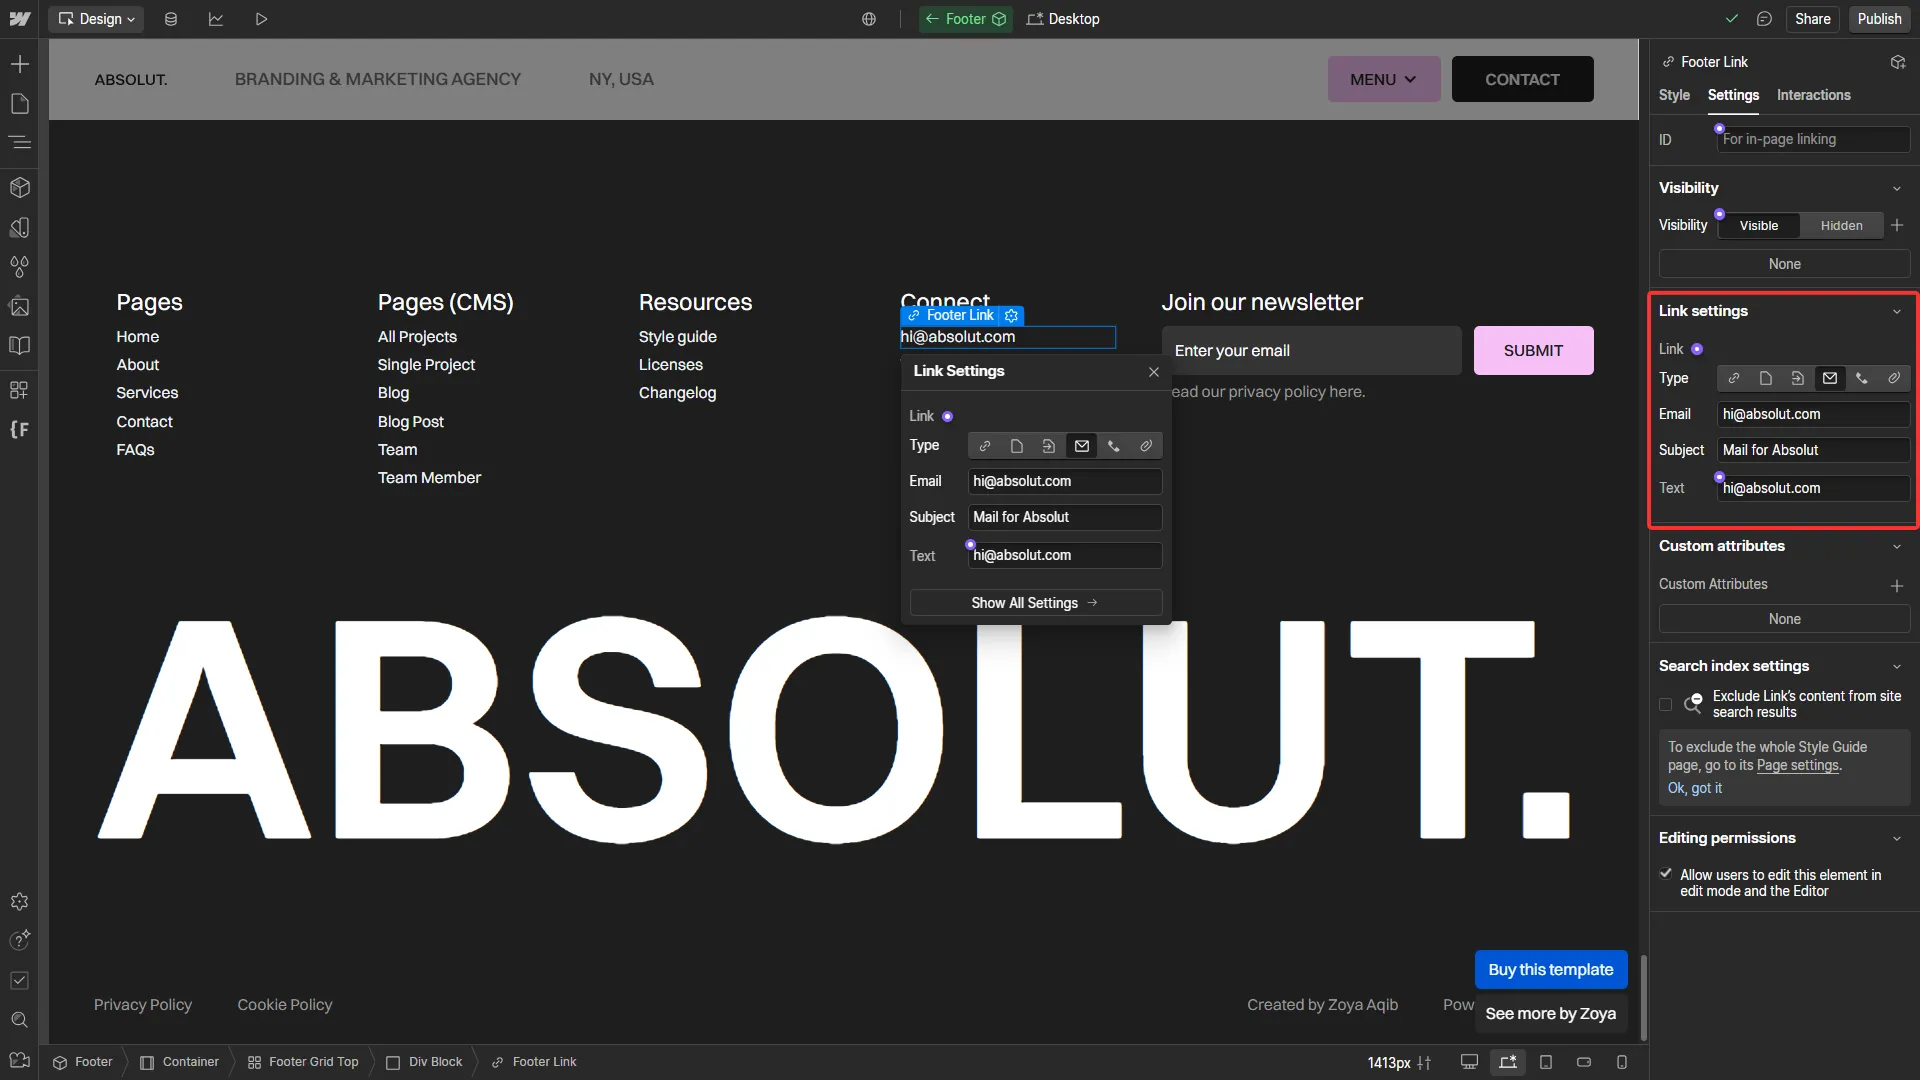
Step 6: Replace all contact and social links
Click any social link or icon
Go to link settings
Here, you can replace the link text or icon as well as the URL or email it is connected to.
How to edit social and other links in your Webflow template
At this point, you're 90% done
If you’ve updated your logo, fonts, colors, text, images, and links, you’ve already taken care of most of the work. Your Webflow template is now tailored to your brand, and these changes are enough to make it feel uniquely yours.
But before you hit publish, there’s one more thing to cover: how to avoid accidentally undoing all that polish. Even the best templates can start to feel messy or inconsistent if you make certain changes the wrong way.
3 common mistakes to avoid
1. Don’t overwrite global styles directly on the page
Changing font sizes, colors, or spacing directly on individual elements (instead of using global styles or classes) often leads to inconsistencies across pages. You may end up spending more time fixing scattered overrides than if you had made changes properly from the start.
What to do instead: Edit fonts, colors, and spacing using base tags (like Body or All Headings) or shared classes from the Style Guide page or from. These changes will apply sitewide and maintain consistency.
2. Avoid making changes to spacing and layouts
Well-designed templates use intentional spacing to make content feel readable and balanced. When you start adding extra padding, shrinking margins, or tightening line spacing without consideration, the entire flow of the site starts to feel off.
What to do instead: Stick to the spacing structure already built into the template. If you're adding new sections or content blocks, replicate the same spacing and alignment patterns to maintain a cohesive visual rhythm.
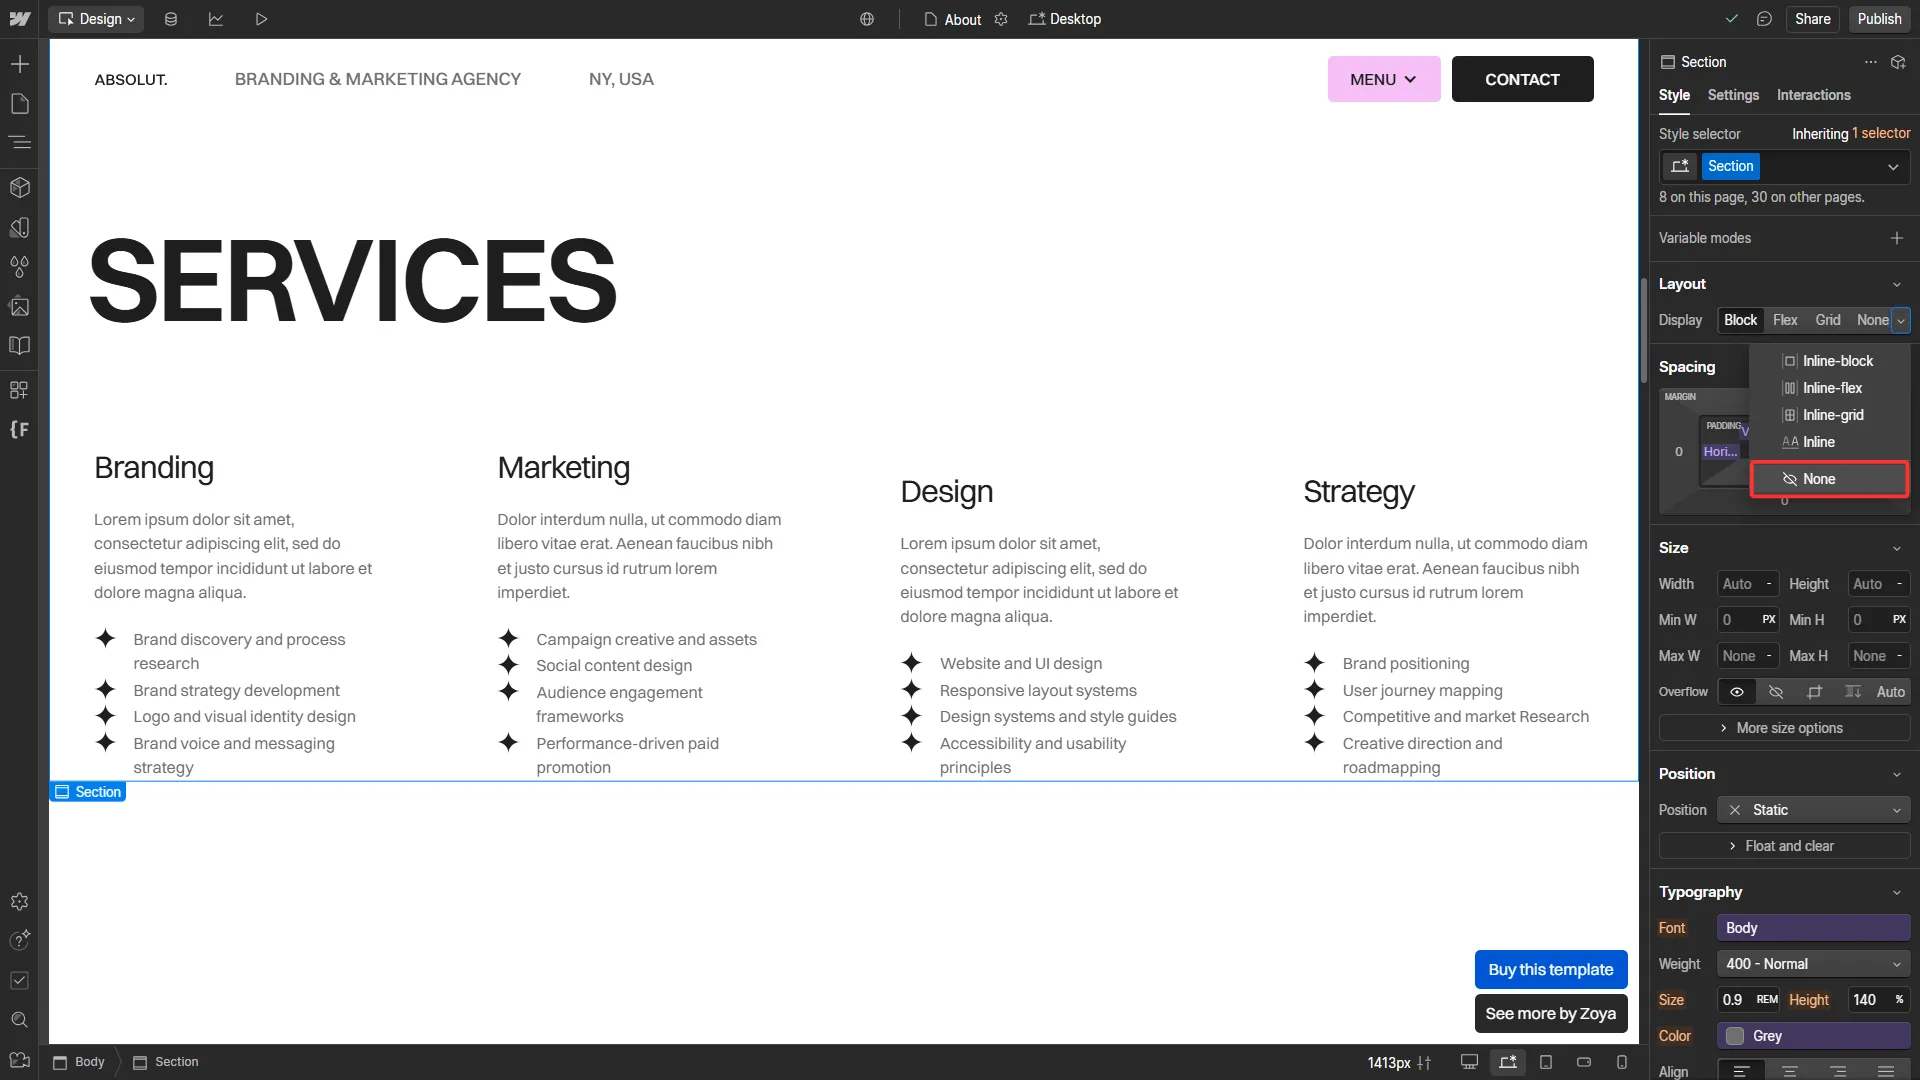
3. Don’t delete sections or pages (even if you don’t need them)
Some sections or elements may seem unnecessary right now, like a blog, testimonials, or case studies. But deleting them too soon can be a mistake. You might find a need for them later, and recreating the structure or styling from scratch can take a lot of time (and may not match the original design).
What to do instead: If you’re unsure about a section or component, simply hide it. Select the element and use the “Hide” option in the Display settings. This removes it from the visible page, both for you and your visitors, but keeps the element intact so you can easily “unhide” it later.
As for entire pages you don’t need immediately, you don’t have to delete them either. Just unlink them from your navigation and mark them as “Draft” in the page settings. Draft pages won’t be published and won’t be accessible to search engines or users, but they’ll still be there for future use.
How to hide sections you don't need (without deleting them) in your Webflow template
Frequently asked questions
I added my branding, content, and images, but the template doesn’t look as good as the original. Why?
This is one of the most common concerns. You’ve followed all the steps, but the site feels… off. In most cases, the issue comes down to images.
Good design isn't just about layout…it’s about visual consistency, and images play a huge role in that. If the original template used high-quality, brand-relevant visuals and your replacements are mismatched or overly generic stock photos, the final result can feel underwhelming. So, make sure you choose images that::
Match your brand’s tone and color scheme
Use consistent lighting and style
Aren’t overly staged or cliché (no handshake images!)
Even when using free stock photos, you can still find high-quality, modern options that feel intentional. Sites like Lummi, Pexels, Unsplash, and Pixabay are good places to start.
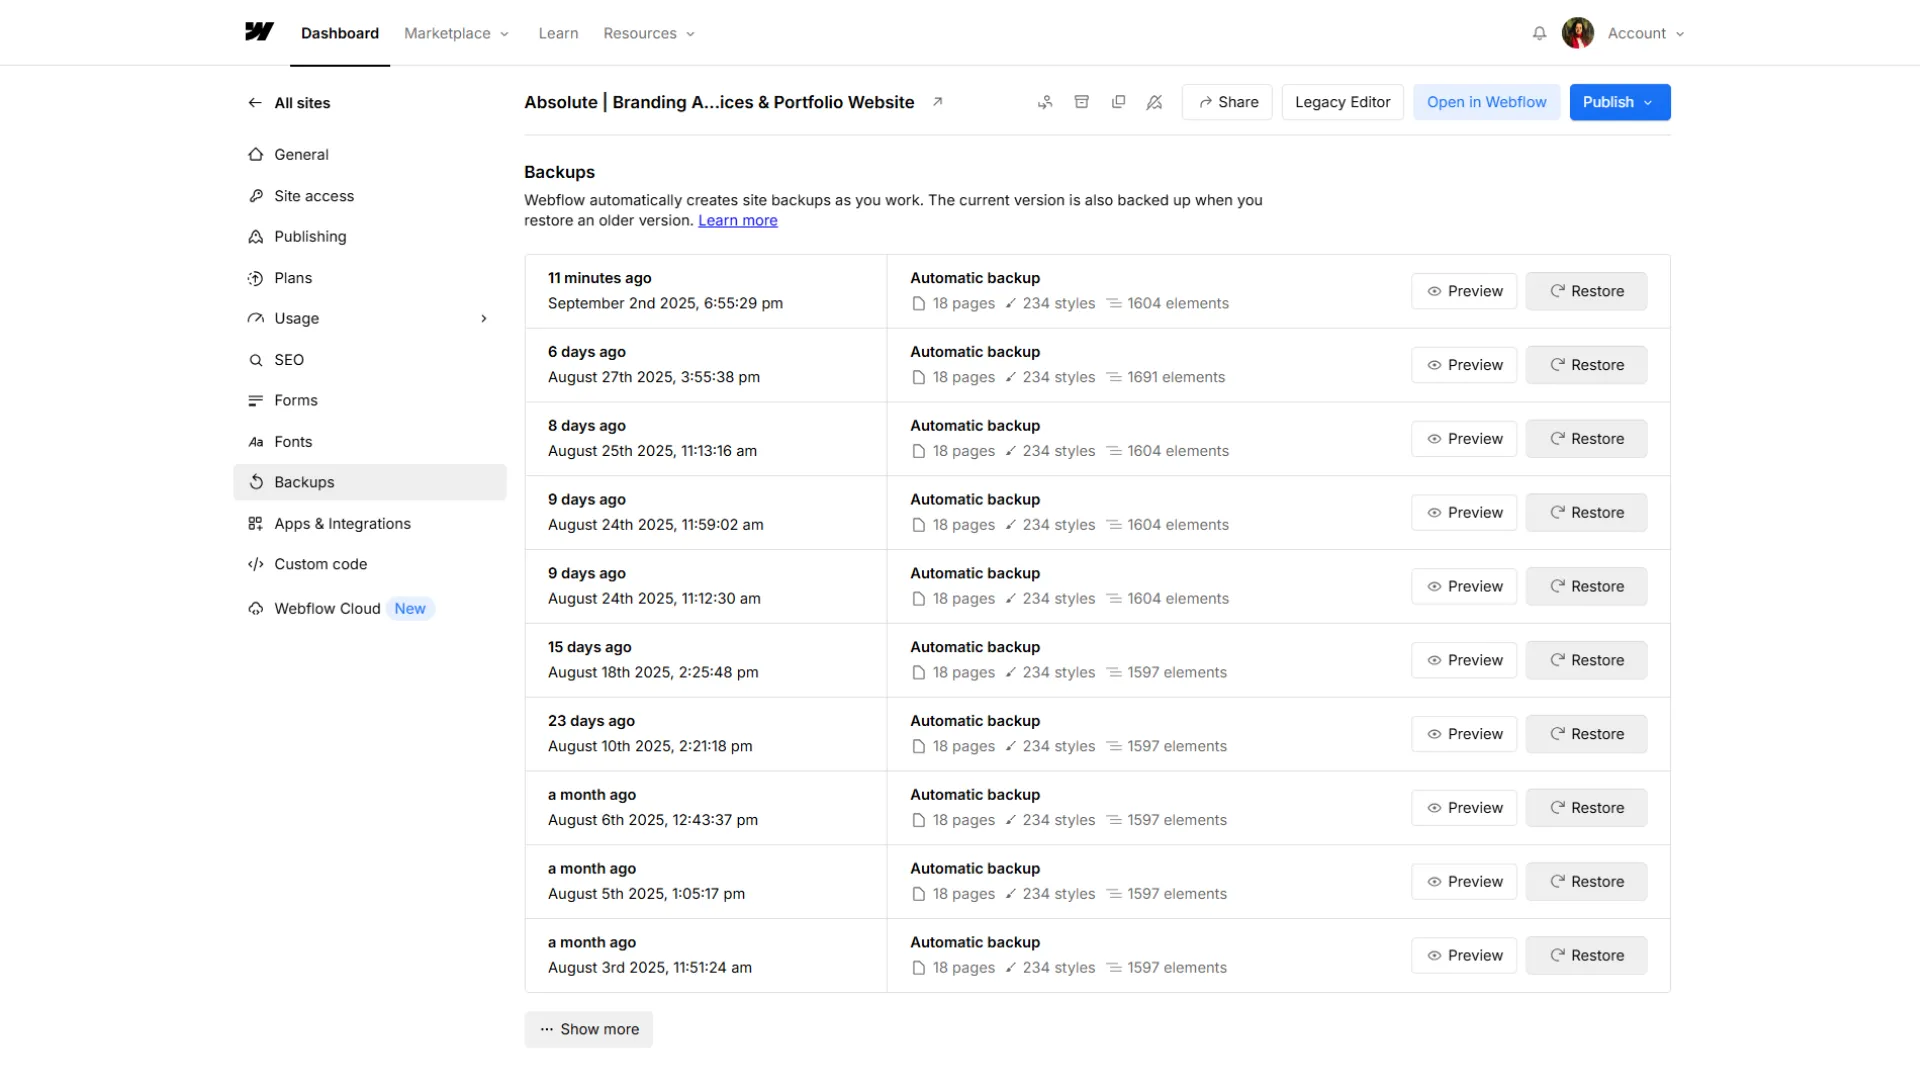
I made mistakes and I think I’ve ruined my template. How do I go back to the original template?
Don’t worry…Webflow has your back!
Webflow automatically saves backups of your site every time you make significant changes. You can go back to any version, even the untouched original! To restore an earlier or the original version of the template:
Open your Site Settings
Go to the Backups tab
Choose the version you want to restore (you can see the time stamps of each backup and even preview how it looked at the time, and click Restore Backup
It’s like an undo button for the entire site. You can experiment freely knowing there’s always a way to roll back.
How to go back to an older or the original version of your Webflow template if you mess up
How will my changes affect the mobile layout?
Webflow templates are usually designed to look great across desktop, tablet, and mobile views right out of the box. If you're just swapping content (like replacing text or images), the design will hold up. But once you start making significant changes, like adding new sections, adjusting spacing, or changing layout structures, those updates won’t automatically adapt to smaller screen sizes. It’s up to you to check how your changes behave on tablet and mobile and adjust them manually if needed. So, here’s what to do:
After adding new sections or making layout changes, click through the tablet and mobile icons in the top toolbar.
Review spacing, stacking, and text sizes at each breakpoint.
Make adjustments directly within those views to ensure everything looks clean and usable across devices.
Do I need to know code to customize a Webflow template?
Not at all. Webflow requires all templates to be built without using any custom code, which means you’ll be working entirely with Webflow’s native features and its visual Designer, no coding necessary.
Everything from updating text and images to changing fonts, colors, animations, and CMS content can be done using Webflow’s visual tools. The platform was built so that designers and business owners (even non-technical ones) could build high-quality websites without writing code.
That said, Webflow does allow for custom code if you ever want to add it, but it’s entirely optional and not needed to customize a template.
What if I get stuck and need help?
It happens! Even with a user-friendly platform like Webflow, some concepts or features can take time to grasp. Here are your options if you get stuck:
Contact the designer. You can look up your Webflow template’s designer’s profile which mentions their contact info like this. Most template creators are eager and willing to assist their customers.
Webflow University – Free, beginner-friendly tutorials on every feature imaginable
YouTube – Lots of step-by-step video tutorials, especially for visual learners
If it’s a template you got from me, you’re always welcome to reach out. I want your customization experience to be as smooth and stress-free as possible.
Over 300 businesses have used my templates to launch their websites faster and look more professional online. Go live in half the time and at a fraction of the cost of custom development, with one of my professionally designed and fully customizable website templates.


.webp)